
Important
This product is a leather replacement cover only designed to install over your original factory component. Plastic trim pieces, mounting rings, hardware, and underlying parts are NOT included. You must reuse your existing OEM components during installation. Product photos are for illustration purposes only.
For more information, please read our Buyer's Guide.






C5 1997-2004 Chevrolet Corvette Shift Boots - Automatic
This product is handmade in Europe and can take up to eight weeks to arrive. No returns or exchanges accepted.
What This Is
A custom-sewn leather shift boot for 1997-2004 Corvette C5 cars with an automatic transmission. It's the leather only: you glue your factory gear-display frame into it and reinstall. It is not a complete shift boot assembly.
What's Included
- Included: 1 leather shift boot, cut and sewn to order in the material and colors you choose.
- Not included: shift knob, trim, frames or hardware. You reuse your factory parts.
Before You Order
- Fits 1997-2004 Corvette with an automatic transmission. Manual? Use our 1997-2004 manual shift boot.
- It's made to order, so it can take up to 8 weeks to arrive and can't be returned or exchanged. Please double-check your year, fitment, and colors before ordering.
- International shipping: every piece ships from Poland, so a $15 international shipping charge applies to each item at checkout.
Installation
Difficulty: Advanced | Tools: T15 Torx driver, 10mm socket, small screwdrivers, epoxy-based glue (Automotive GOOP), zip tie
The center console has to come out. You'll glue the gear-display frame into the new boot and reinstall.
▼ Click to Open / Close Step-by-Step Installation Guide (16 Steps)

Step 1. Convertibles only: remove the waterfall (4 T15 Torx screws: 2 on top, 1 each side) and pull it straight up.

Step 2. Open the armrest, pry off the two oval covers toward the rear, and remove the two 10mm nuts underneath.

Step 3. Pry up the trim plate next to the armrest (the one with the indicator buttons), starting from the armrest side.

Step 4. Unplug all connectors under it.

Step 5. Remove the 2 exposed 10mm nuts and the accessory power connection.

Step 6. Lift the console up and back slightly, unplug the last connector, and remove the console.

Step 7. Remove the ashtray and the two T15 Torx screws behind it.

Step 8. Pry off the small trim piece next to the ignition key from below.

Step 9. Remove the T15 Torx screw behind it.
Step 10. Remove the key and slide the center console rearward a few inches, then unplug the lighter and remove it. Manual: put it in 2nd, 4th or 6th first. Automatic: key to ON (not start), select low, then return to Park after removal.

Step 11. With the console out, this is what you'll see.

Step 12. Remove the staple at the front of the shift knob's base and pull the knob straight off.

Step 13. Stretch the boot's elastic off its frame. The boot is still held by the plastic frame around the gear display, so don't pull hard yet.
Step 14. Spread the two small teeth holding one end of that frame with small screwdrivers and lift the tab; the other end slides free. Cut the factory zip tie at the top and remove the boot.

Step 15. Glue the small plastic frame into the new boot with an epoxy-based glue such as Automotive GOOP, working one section at a time and keeping the leather flush with the frame's edges. Check the frame's orientation before you start.

Step 16. Zip-tie the top of the boot to the lever (boot inside out, top end first), seat the frame around the gear display and the elastic, reinstall the knob and staple, then reinstall the console.
Leather care: apply a leather conditioner with UV protection every 4-6 weeks to keep it from drying out and cracking.
Options & Pricing
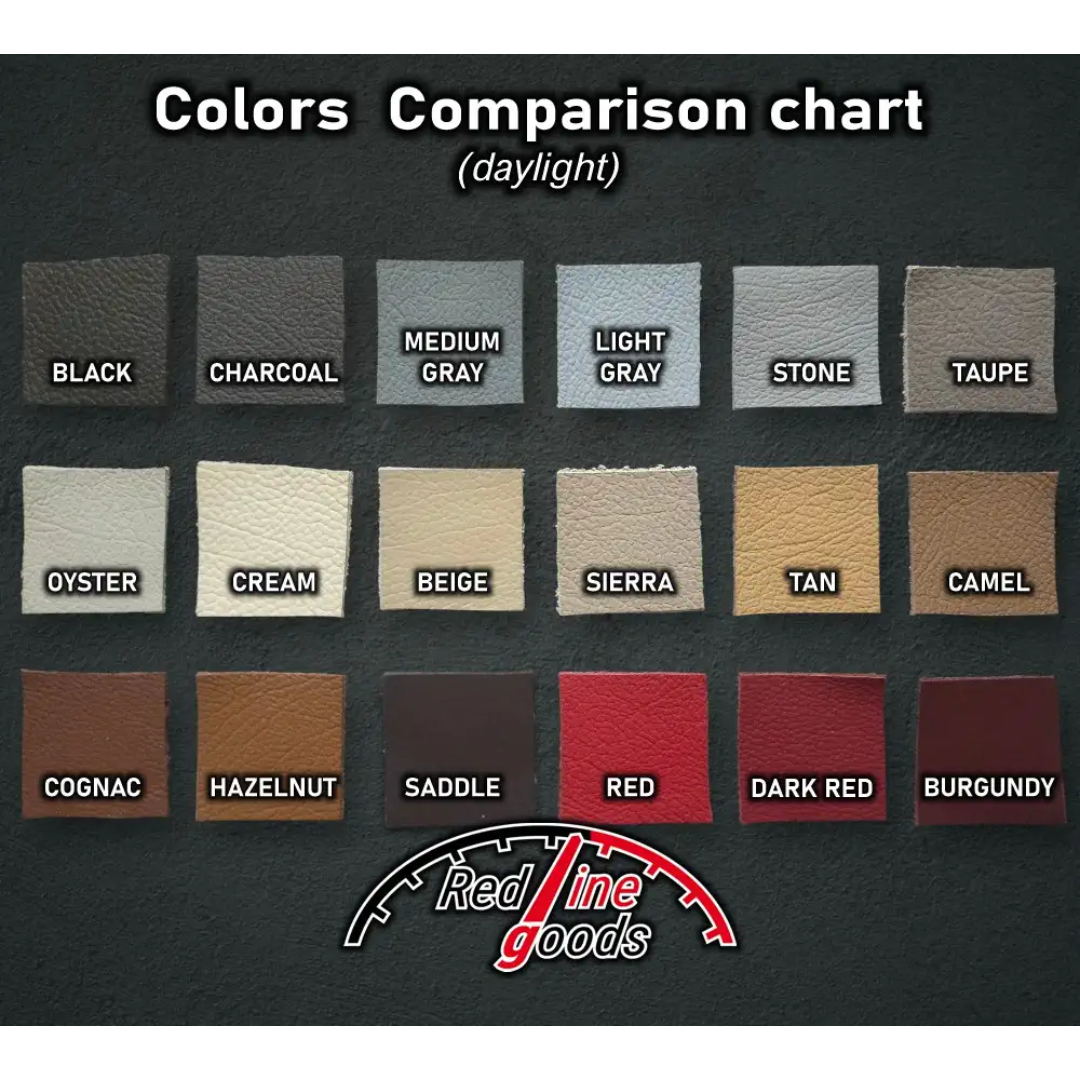
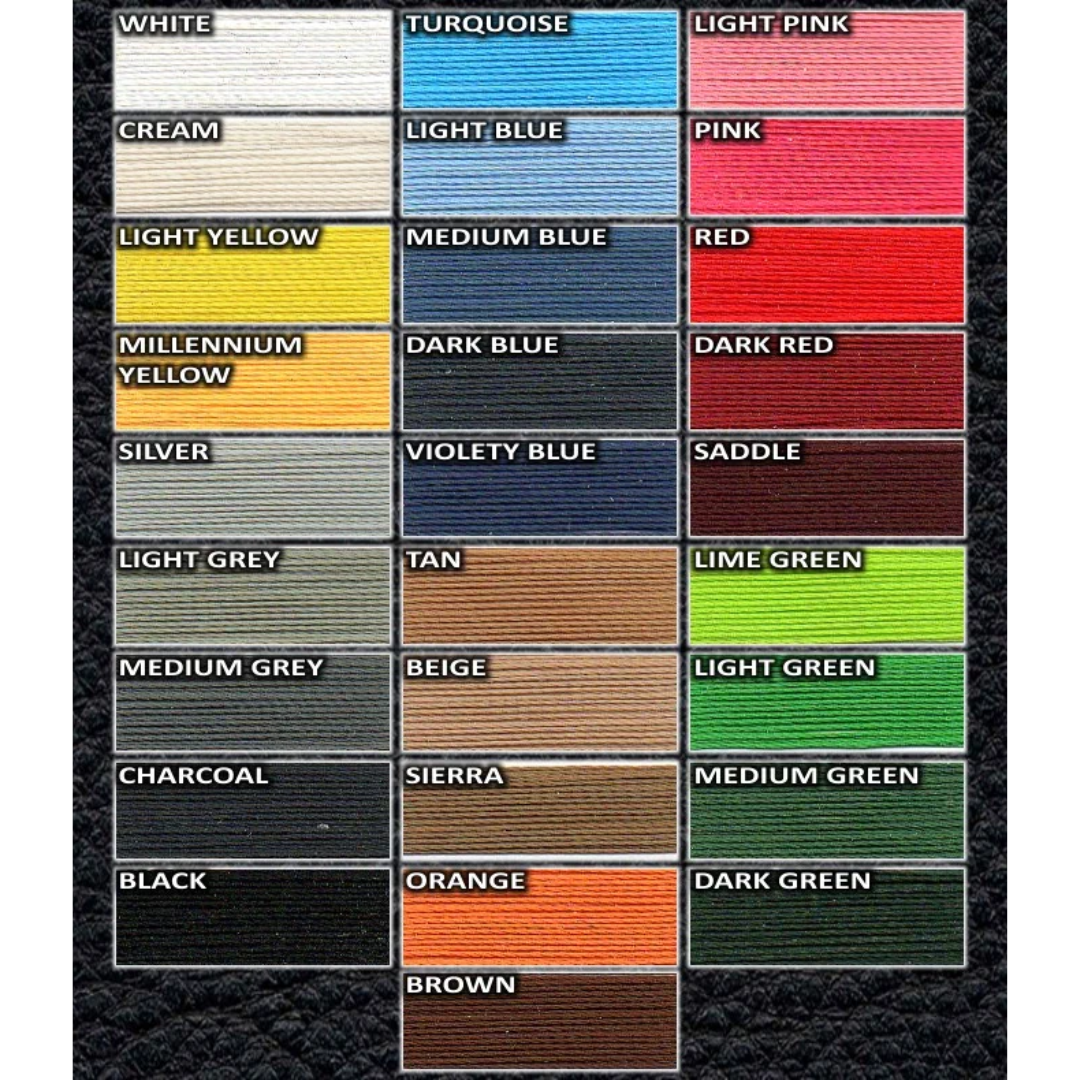
Choose your material, 50+ colors, and 38 stitching colors in the options above. Add-on prices are added in the cart.
Material
- Regular Leather
- Perforated Leather
- Nappa Leather +$15
- Genuine Alcantara +$25
- Faux Alcantara
- Carbon Fiber Vinyl
Layout
- Default (Like My Factory Boot)
- 4 Panel (Stitching Forms An X) +$9
- Front to Back (Axis Of Car) +$9
Style
- Quadruple Thread +$9
- Stripes +$8
- Double Racing Stripes +$15
Quadruple stitching color applies to the outer lines of thread.
Customer Care
Frequently Asked Questions
Q: Is my personal information kept private? Is it safe to use my credit card?
A: Yes, your personal information is kept private and it is safe to use your credit card.
Q: How much will shipping cost?
A: Unfortunately, the cost of shipping is a real expense. Our goal is to minimize your shipping costs. Shipping is calculated at checkout based on the items in your cart and will be displayed prior to you placing an order. Please note that oversized items may be subject to additional charges, which will be noted on the product page.
Q: How do I track my order?
A: Once your order ships, you will receive a tracking notification via email. You are not required to purchase, download or use the Route app to track your order - this is an optional feature of the Route Package Protection service.
Q: Can someone outside of the United States place an order?
A: Yes, we are happy to provide worldwide service for our customers. Your shipping charges will be calculated during the checkout process. Customs and duty fees are the responsibility of the buyer.
Blog posts
 Read more
Chevrolet is in its 16th straight year backing the American Cancer Society's Making Strides Against Breast Cancer, with a $1 million goal, walks in more than 30 communities, an Instagram donation prompt and the pink Corvette pacing Talladega.
 Read more
The Corvette Z06 GT3.R teams delivered Chevrolet's 16th GT-class manufacturer championship at a wild Petit Le Mans, and the second straight IMSA GTD PRO title.
 Read more
Detroit's Rebel Nell is now an official Corvette licensee, turning layers of paint from the Bowling Green factory into one-of-a-kind jewelry handcrafted in Detroit.


